Multiecuscan (MES) Configuration for the Alfa Romeo Giulia/Stelvio NON Quadrifoglio
Prerequisites
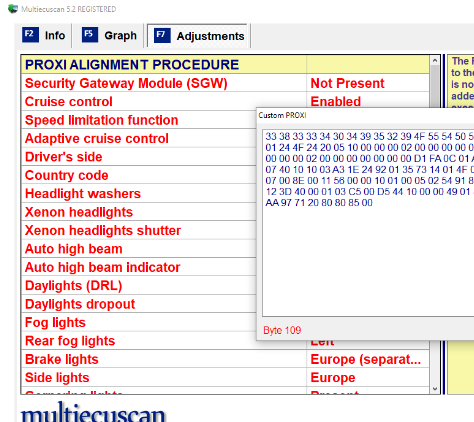
Editing Raw PROXI Data
- Navigate to:
- Alfa Romeo Giulia 2.0 Turbo 16V Multiair → Body → CAN Setup / PROXI ALIGNMENT PROCEDURE (952)
- Click on the Adjustment tab
- Hit Ctrl+Alt+C to open the PROXI bytes dialog.
NOTE: It is highly recommended that you select all and save this PROXI data to a text file for ease of restore if you happen to mess something up.
WARNING Pay close attention and only alter what you are attempting to alter as these settings can have dire consequences if changed unknowingly.
PROXI Alignment Procedures
- Select PROXI ALIGNMENT PROCEDURE and hit Execute
- Follow the prompts, switch cables when prompted
- Once the PROXI alignment procedure is complete you will need to run a few calibrations to remove the numerous warning lights you more than likely have
- Disconnect from the Body module
- Connect to the ABS / Continental ABS MK C1 module. (Requires gray cable)
- Select Parameters tab, check Steering Angle parameter and set wheel so it’s at 0°
- Select the Adjustments tab and perform the following three procedures:
- Reset steering angle
- Lateral and longitudinal acceleration sensor calibration
- Pressure sensor calibration
- Once these are complete, disconnect from the ABS module
- Unplug the OBD2 adapter.
- Turn off the vehicle and wait >30 seconds until the dash lights all turn off.
- Turn on the vehicle (no start) and turn the steering wheel full lock, left and right and back to center.
- Turn off the vehicle again, wait >30 seconds
- Turn on and all warning lights should be gone
- If errors do not clear, repeat steps 10-12
Configurations
Popular MultiEcuScan (MES) PROXI Settings.docx
Enable Race Mode:
- Body → CAN Setup
- Choose:
- If older than MES version 4.5:
- To enter PROXI configuration, go to the Adjustment tab, then hit Ctrl+Alt+C (Custom PROXI)
- Find byte 88. It should be “AC” (OEM value)
- Replace AC with CC or EC in byte 88
- Hit the Execute or OK button (I don’t remember what it is)
- If MES 4.5 or higher:
- Click the Adjustments tab, select Dynamic Control Selector, click Execute in the lower right
- Choose either of the other two modes besides Type 1 (OEM setting AC)
- Type 3/DNA/Sport is EC, and Type 2/DNA is CC
- Choose one and click OK
- If older than MES version 4.5:
- PROXI alignment is needed
Enable Adaptive Cruise (ACC+)
- Body → CAN Setup
- set “Cruise Control” to “disabled”
- set “ACC” to “ACC+”
- PROXI alignment needed
Enable EU Paddle Shifter Logic
- Body → CAN Setup
- Byte 156, bits 4-5 (need to do bitwise calculation):
- EU version (shift from P/R to D with [+] paddle, [-] together with [+] shifts to N):
- xx00xxxx
- US version:
- xx01xxxx
- EU version (shift from P/R to D with [+] paddle, [-] together with [+] shifts to N):
- PROXI alignment needed
Enable Window Comfort Opening/Closing (doesn’t work for all markets)
- For MES version >= 4.7:
- Body → CAN Setup → Adjustments
- Windows comfort something something: enable
- For MES version < 4.7 you need to configure the PROXI byte:
- Byte 58, bit 1:
- disabled
- xxxxxx0x
- enabled:
- xxxxxx1x
- disabled
- Byte 58, bit 1:
- PROXI alignment needed
Enable After-wipe (extra wipe after normal sprayer sequence)
- Body → CAN Setup
- byte 126, bit 5:
- after-wipe enabled:
- xx0xxxxx
- after-wipe disabled:
- xx1xxxxx
- after-wipe enabled:
- PROXI alignment needed
Adjust TPMS Pressure Thresholds
- Body → RFHub → Adjustments (MES >= 4.7R3)
- Front / Rear wheels pressure reference (do both)
- I chose 32 / 34 F/R 32F/34R
- NO PROXI alignment necessary
Disable Seat Belt Chime
- Dashboard → Instrument Panel
- Adjustments tab, Find it there somewhere
- NO PROXI alignment necessary
Battery type
NOTES
- Before replacing the battery when you believe it’s going bad, make sure that you aren’t stuck in a charging mode that only does minor “top offs” instead of a full charge. @Barbuck has this great document that goes into the charging system functions in extreme detail. It’s a lengthy read but well worth it.
https://drive.google.com/file/d/18D4S5eWywDgsIXEIggsCitIkfbYR-ljN/view?usp=sharing - Barbuckle also provided this battery guide.
- https://drive.google.com/file/d/1c3e_StIxOpE9NJ__Zl95P025UKomZdQV/view?usp=sharing
- Based on the linked document in the previous bullet point (page 15), you should not have to change any of the following settings as that is determined automatically during the learning phase after resetting the Intelligent Battery Sensor (IBS).
Leaving this information here for historical purposes.
* Body → CAN Setup
* **Battery type
byte 63, bits 0-3 (bit order: 76543210):**:
* xxxx0001 - 80Ah 680A - default setting for Giulia/Stelvio EU
* xxxx0010 - 95Ah 800A - default setting for Giulia/Stelvio US
* xxxx0011 - 80Ah 680A - default setting for diesel Giulia/Stelvio
* xxxx1000 - H7 flooded
* xxxx1001 - H7 AGM;
* xxxx1010 - H8 flooded;
* xxxx1011 - H8 AGM - default setting for Giulia/Stelvio MY20 models US/EU