Bleeding Brakes, for 2.0/2.9
Motive Power bleeder is the best, the BEST!!
Our Giulia’s take DOT 4 or DOT 5.1 (glycol based fluid) DO NOT MESS AROUND WITH INCOMPATIBLE FLUIDS
-
Place the vehicle in Brake Service Mode via the Infotainment System
-
Disconnect the negative battery cable
-
Place a towel over the trunk latch to prevent closing as you no longer have power to the system
-
Suck out as much fluid from the reservoir as you can and fill to the MAX line (this is just above the seam a small amount).
-
Dump complete bottle (1L) (or two) into a clean power bleeder and pump up to 30psi (or more, IMO).
-
Bleeding:
*Crack each bleeder to let enough fluid out so it runs clean while clearing any bubbles from the line into the catch can and close the bleeder.
- Front right - inner
- Front right- outer
- Front left - inner
- Front left - outer
- (2.0 only):
- Rear-Right
- Rear-Left
- (2.9 only):
- Rear-Right inner
- Rear-Right outer
- Rear-Left inner
- Rear-Left outer
- Same thing, different order, but pumping the brake pedal this time:
- Front left - inner
- Open the bleeder screw allowing a small amount of brake fluid to drain into the recovery container.
- With the bleeder still open, have the assistant press the brake pedal three times SLOWLY and close the bleeder if the fluid is free from air.
- Front left - outer
- Open the bleeder screw allowing a small amount of brake fluid to drain into the recovery container.
- With the bleeder still open, have the assistant press the brake pedal three times SLOWLY and close the bleeder if the fluid is free from air.
- Front right - inner
- Open the bleeder screw allowing a small amount of brake fluid to drain into the recovery container.
- With the bleeder still open, have the assistant press the brake pedal three times SLOWLY and close the bleeder if the fluid is free from air.
- Front right- outer
- Open the bleeder screw allowing a small amount of brake fluid to drain into the recovery container.
- With the bleeder still open, have the assistant press the brake pedal three times SLOWLY and close the bleeder if the fluid is free from air.
- Rear right (2.0 only)
- Open the bleeder screw allowing a small amount of brake fluid to drain into the recovery container.
- With the bleeder still open, have the assistant press the brake pedal three times SLOWLY and close the bleeder if the fluid is free from air.
- Rear left (2.0 only)
- Open the bleeder screw allowing a small amount of brake fluid to drain into the recovery container.
- With the bleeder still open, have the assistant press the brake pedal three times SLOWLY and close the bleeder if the fluid is free from air.
- Rear right (2.9 only)
- Open the INNER bleeder screw allowing a small amount of brake fluid to drain into the recovery container.
- With the bleeder still open, have the assistant press the brake pedal three times SLOWLY and close the bleeder if the fluid is free from air.
- Repeat for the OUTER bleeder screw
- Rear left (2.9 only)
- Open the INNER bleeder screw allowing a small amount of brake fluid to drain into the recovery container.
- With the bleeder still open, have the assistant press the brake pedal three times SLOWLY and close the bleeder if the fluid is free from air.
- Repeat for the OUTER bleeder screw
- Front left - inner
-
Connect the negative battery cable.
-
Start the Replace Control Unit function to check for air in the hydraulic circuit between the control unit and the brake caliper. (based on WiTech functions)
- Follow what it says when using AlfaOBD app. I skipped the actual bleeding process in this function as it would have been redundant. I believe the WiTech “Replace Control Unit” function is different than the AlfaOBD function.
- Pay very close attention to what the function tells you as you need to follow the fluid level, cap on/off, fluid filled / reduced to the Max fill line parts to a tee. Don’t make assumptions as I did and had brake fluid spewing out of the installed and tightened cap the first time I ran it.
- Check that the volumes shown on the scan tool (AlfaOBD) are equal to or less than the maximum shown in the table. (Honestly, mine were a little off from these values, but I bleed them so many times I knew it was OK)
| Location | 200HP Volume (mm3) | 280HP Volume (mm3) |
|---|---|---|
| Left front | 1440 – 2550 | 1495 – 2755 |
| Right front | 1625 – 2735 | 1790 – 3050 |
| Right rear | 870 – 1990 | 870 – 1990 |
| Left rear | 855 – 1975 | 855 – 1975 |
-
If any of the values shown in the table are higher than the reference threshold, repeat the bleeding procedure. (only if they are really out of spec)
-
If after repeating the bleeding procedure, the maximum values for the rear calipers are still higher than the limit values, proceed as follows:
-
Identify which calipers are still out of range and remove them without disconnecting the hose.
-
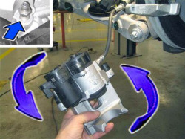
Turn the brake caliper very slowly several times to the various possible positions, stop the motion and keep the bleeder screw pointing upwards for a few minutes.
-
Install the brake caliper.
-
Repeat the bleeding procedure using the scan tool.
-
PUMP THE BRAKES
-
Connect the negative battery cable. If equipped with an Intelligent Battery Sensor (IBS), connect the IBS connector after connecting the negative battery cable.
-
Remove the electric park brake from maintenance mode.
-
Install all four wheels (Refer to Tires and Wheels/Removal and Installation).
-
Start car and turn the steering wheel from lock to lock and back to center.
-
Turn off the car for >30 seconds
-
Turn back on and errors should be cleared (errors caused by disconnection of the battery)
Remember that brake fluid is corrosive. Wipe off any surfaces and clean them thoroughly. Brake fluid will eat through paint. It is also hygroscopic (absorbs water/moisture from the air), so never use partially used fluid older than a few months, even if the cap is tight. It’s not worth the risk.
OE Brake bleed procedure.pdf (1.9 MB)